The Weekly Goldendoodle Ear Routine Step by Step
One of the most common frustrations Goldendoodle parents face is the battle against ear infections. You love those floppy, fuzzy ears, right? But underneath all that adorable fluff and warmth, it's a perfect breeding ground for trouble. If you've been struggling to keep your Goldendoodle's ears healthy, feeling overwhelmed by conflicting advice, or just not sure where to start with a consistent routine, this guide is for you. We'll walk through a step-by-step weekly ear cleaning routine that's gentle, effective, and designed to keep those furry floppy ears happy and infection-free.
Why Goldendoodle Ears Are a Unique Challenge
Let's be honest, those beautiful Goldendoodle ears are a magnet for problems. They're not like the upright, airy ears of some breeds. Instead, they hang down, creating a warm, moist, and often hairy environment that's just begging for bacteria and yeast to set up shop. It's a tale as old as time for doodle owners, and it’s why a proactive approach to ear care isn’t just good practice—it’s absolutely essential.
The Furnished Ear Canal's Challenge
One of the defining characteristics of a Goldendoodle is its "furnishings"—that lovely facial and ear hair that contributes to their signature shaggy look. While great for cuddles, this hair doesn't stop at the outer ear; it continues growing inside the ear canal itself. Imagine trying to keep a carpeted, dark, damp tunnel clean. That's essentially what you're dealing with. This internal hair traps moisture, debris, and wax, preventing proper airflow and making it incredibly difficult for the ear to dry out naturally. It's a major reason why Goldendoodle Ear Infections Under a Furnished Ear are so common. Without regular cleaning and attention, this trapped matter can quickly lead to irritation and infection.
Humidity and Heat Under the Flop
Beyond the internal hair, the very structure of a Goldendoodle's floppy ear creates its own set of problems. The ear flap hangs down, covering the ear canal and effectively sealing it off from the air. This creates a miniature greenhouse effect—warm, humid conditions that yeast and bacteria absolutely thrive in. Think about how stuffy it can get under a heavy blanket; now imagine that inside your dog's ear, week after week. If your Goldendoodle loves to swim, or even just gets a good bath, that trapped moisture is amplified, making it even more urgent to dry and clean those ears properly. The humidity can compound existing issues, leading to a quick escalation from minor irritation to a full-blown, painful infection.
Recognizing the Early Warning Signs
Many owners miss the subtle cues that an ear infection is brewing, often because the Goldendoodle's thick ear hair can hide the redness and discharge until it's quite advanced. You might not see it, but you'll likely smell it. A foul, yeasty, or sweet odor emanating from the ear is a huge red flag. Other signs include frequent head shaking, scratching at the ears (sometimes aggressively enough to cause injury), tenderness when you touch their head, or rubbing their ears against furniture. Sometimes, a dog will tilt their head to one side, favoring the painful ear. Catching these signs early can save your Goldendoodle a lot of discomfort and you a hefty vet bill. Learning to recognize these subtle shifts is a critical part of being a vigilant Goldendoodle parent.
Gathering Your Goldendoodle Ear Cleaning Toolkit
Before you even think about starting the ear cleaning process, gather everything you need. This isn't a task you want to pause mid-way through because you're missing cotton balls. Having all your supplies ready not only makes the process smoother for you but also helps your Goldendoodle feel more secure, as they learn to anticipate the routine. Think of it like setting up your own little grooming station, ready for action.
Choosing the Right Ear Cleaner
This is perhaps the most important item in your toolkit. You must use a veterinarian-approved ear cleaning solution specifically designed for dogs. Do not, under any circumstances, use rubbing alcohol, hydrogen peroxide, or any other household cleaners, as these can be irritating or even damaging to your Goldendoodle's sensitive ear canal. Look for cleaners that are gentle, drying, and contain ingredients that help break down wax and soothe the skin. Many excellent brands are available from pet supply retailers like Chewy or even your local vet's office. If your Goldendoodle has recurring issues, your vet might recommend a specific medicated cleaner. Always follow your vet's advice on which product to use, especially if there's a history of infections. For routine maintenance, a gentle, alcohol-free solution is usually ideal.
Essential Grooming Tools for Ear Health
Beyond the cleaner, a few other items will make your weekly routine much easier and more effective.
- Cotton Balls or Gauze Pads: These are perfect for wiping out the ear. Avoid cotton swabs (Q-tips) for deep cleaning, as they can push debris further into the ear canal or even damage the eardrum. Save cotton swabs for cleaning the external nooks and crannies of the outer ear flap only.
- Soft Towel: For catching drips and wiping excess solution, and also for wrapping your Goldendoodle if they're a bit squirmy.
- Ear Hair Removal (Optional): Some Goldendoodles benefit from having excess hair plucked from their ear canals to improve airflow. This is best done by a professional groomer or vet, as it can be painful and risky if done incorrectly. If you choose to do it yourself, use blunt-nosed tweezers and only remove sparse hair from the outermost part of the canal, after consulting your vet or groomer for proper technique. Never pull large clumps of hair.
- Blunt-nosed Scissors: For carefully trimming the hair around the entrance of the ear canal and on the inner flap, which can also help with airflow and make it easier to clean. Again, extreme caution is needed. Hair Growing Inside a Goldendoodle Ear Canal often needs attention.
- Gloves: If you're sensitive to the cleaner or prefer not to handle ear wax directly, disposable gloves can be useful.
Treats and Comfort Items for a Happy Experience
Making ear cleaning a positive experience is crucial for building trust with your Goldendoodle. Goldendoodles are intelligent and eager to please, but like any dog, they respond best to positive reinforcement.
- High-Value Treats: Have a stash of truly irresistible treats ready. These should be small, soft, and easy for your dog to swallow quickly. Brands like Ollie often offer soft, flavorful options that dogs go wild for.
- Calming Presence: Your demeanor matters more than you might think. Approach the task calmly and confidently. If you're anxious, your Goldendoodle will pick up on it.
- Comfortable Space: Choose a quiet, well-lit area where your Goldendoodle feels relaxed. A soft mat or towel on the floor can help. For smaller Goldendoodles, a raised table might be easier for your back, but ensure it's a non-slip surface and your dog is secure.
- Patience: This isn't a race. Take your time, offering praise and treats throughout the process.
Your Step-by-Step Weekly Ear Cleaning Routine
Alright, you've got your gear, you're mentally prepared, and your Goldendoodle is (hopefully) none the wiser about the impending ear adventure. Let's break down the routine into manageable steps to ensure a thorough and stress-free experience for both of you. Consistency is key here; a weekly routine helps prevent problems before they start.
Creating a Calm Environment
Before you even touch an ear, set the stage. Find a quiet spot in your home where there are no distractions from other pets, loud noises, or family members. Lay out your towel and all your tools within easy reach. Have those high-value treats (maybe some tasty morsels from Chewy or Ollie) ready to go. Gently call your Goldendoodle over and have them sit or lie down in a comfortable position. Offer some initial praise and a treat just for cooperating. Pet them, reassure them with your voice, and let them know this is a calm, positive interaction. Some owners find that a short walk or playtime beforehand can help burn off excess energy, making their Goldendoodle more amenable to sitting still. Remember, if you're tense, they'll be tense.
The Gentle Cleanse: Solution Application
This is where the magic happens.
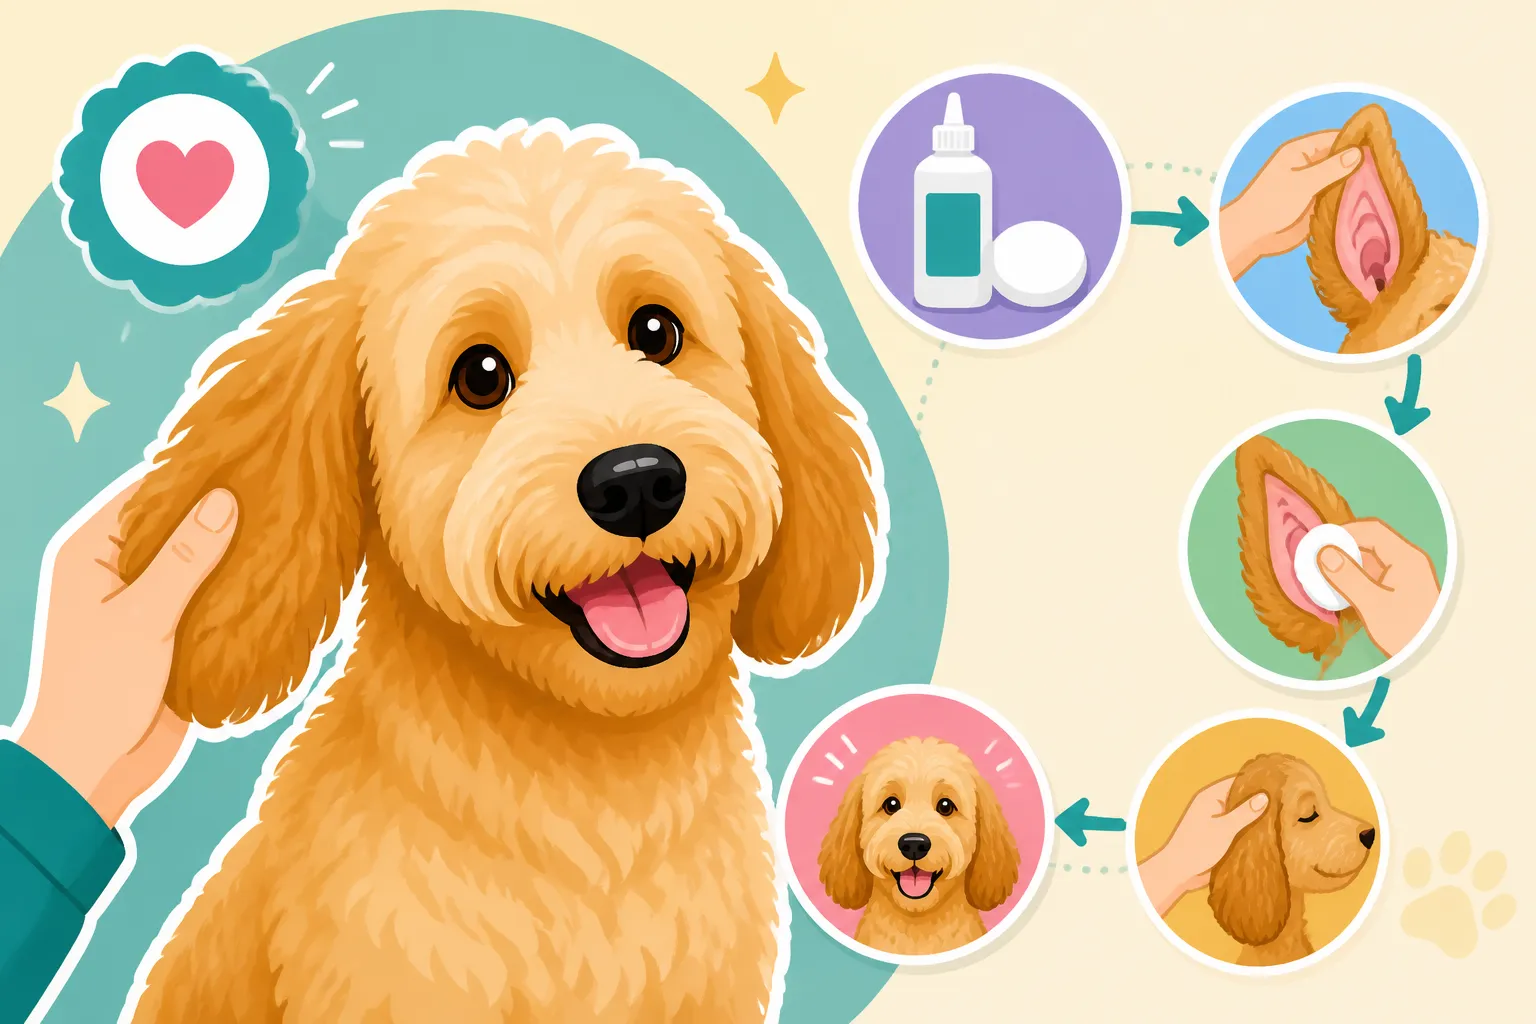
- Lift the Ear Flap: Gently lift one of your Goldendoodle's ear flaps to expose the ear canal. You'll see the opening and perhaps some hair.
- Inspect (Briefly): Take a quick look. Is there any obvious redness, swelling, or excessive discharge? Any foul odor? If you spot severe irritation or a large amount of dark, waxy buildup, it might be time to skip the home cleaning and call your vet.
- Apply Solution: Holding the ear flap up, carefully insert the tip of the ear cleaner bottle into the opening of the ear canal. Don't push it too deep! Squeeze the bottle to release a generous amount of solution into the ear canal. You want enough to fill it up a bit, but not overflowing constantly. Most dogs will react a little to the cold liquid, which is normal.
- Massage: Immediately after applying the solution, gently massage the base of the ear for about 30 seconds. You should hear a squishy, sloshing sound, which tells you the cleaner is working its way deep into the ear canal, breaking up wax and debris. This massage is crucial for the cleaner to do its job. Your Goldendoodle might shake their head at this point—that's okay, it helps dislodge the gunk!
Massaging and Wiping Away Debris
Once you've massaged the solution in, it's time to let your Goldendoodle shake their head. Stand back a bit or have your towel ready to catch any spray. This head shaking helps bring the dissolved gunk and excess solution up from the deeper parts of the ear canal.
- Wipe the Outer Ear: After the head shake, take a fresh cotton ball or gauze pad and gently wipe out the visible parts of the outer ear canal and the underside of the ear flap. You'll likely see a brownish or yellowish residue—that's the wax and debris the cleaner has dislodged. Continue wiping with fresh cotton balls until no more visible dirt comes out. Remember, only wipe what you can see. Do not probe deep into the ear canal with anything.
- Repeat for the Other Ear: Once one ear is clean, move on to the other, following the exact same steps.
- Address External Hair: If you choose to trim external ear hair or pluck very sparse outer canal hair, do so after cleaning and when the ear is dry. This helps prevent irritation from the cleaning solution getting into fresh nicks, though again, a professional groomer is usually best for this task. You can find small, blunt-nosed scissors or dedicated ear-trimming tools on Amazon.
Rewarding Positive Cooperation
Throughout this entire process, and especially at the end, make sure to praise your Goldendoodle profusely and offer those high-value treats. Even if they were a little squirmy, reward them for the parts they did cooperate with. You want them to associate ear cleaning with positive outcomes, not punishment or discomfort. A belly rub, a quick game of fetch, or a puzzle toy can also serve as a great reward. Over time, with consistent positive reinforcement, many Goldendoodles will learn to tolerate, and sometimes even enjoy, their weekly ear spa session. This helps reinforce the positive bond you share and makes future grooming much easier.
Troubleshooting Common Goldendoodle Ear Issues
Even with a perfect routine, Goldendoodle ears can be finicky. It's important to know how to handle resistance, recognize when a problem is beyond home care, and integrate other preventative measures into your overall care strategy. Don't get discouraged if you hit a snag; it's part of being a Goldendoodle parent!
Dealing with Resistance and Fear
Some Goldendoodles, especially if they've had a painful ear infection in the past or weren't desensitized to handling as puppies, can be quite resistant to ear cleaning. This is understandable—it's an intrusive procedure for them.
- Go Slowly: Don't force it. If your Goldendoodle is truly distressed, take a step back. Start by just touching their ears for a second, then treat. Gradually increase the duration and intensity of handling, working up to lifting the flap, then touching the ear canal, then applying solution. This might take days or even weeks. Look for resources on Getting a Goldendoodle to Accept Ear Handling.
- Positive Association: Pair every step with a treat and praise. Make it a game! Use a happy, upbeat tone.
- Vet Consultation: If the fear is extreme or results in aggression, talk to your vet or a certified professional dog trainer. They can offer strategies, or in some cases, gentle sedatives or anxiety medication for initial sessions to help break the cycle of fear.
- Distraction: For some dogs, a lick mat smeared with peanut butter (xylitol-free, of course!) can keep them occupied and still during the cleaning. You can find great options on Amazon.
When to Call the Vet: Beyond Routine Cleaning
Regular cleaning is preventative, but it won't cure an active infection. You absolutely must consult your veterinarian if you notice any of the following signs:
- Excessive Redness or Swelling: More than just a little irritation from cleaning.
- Severe Pain: Your dog cries out when their ear is touched.
- Heavy, Foul-Smelling Discharge: Especially if it's dark brown, yellow, green, or smells strongly yeasty or putrid.
- Bleeding or Ulcers: Any open sores or blood.
- Head Tilt or Loss of Balance: This could indicate a deeper ear infection affecting the inner ear.
- Chronic Recurrence: If ear infections keep coming back despite your best efforts, there might be an underlying issue like allergies or a foreign body. Goldendoodle Ear Infections That Return Every Month warrant a deeper look.
Your vet can properly diagnose the type of infection (bacterial, yeast, mites) and prescribe appropriate medication, which might include medicated ear drops or oral antibiotics. Trying to treat an active infection at home with just a cleaner can delay proper treatment and worsen the condition.
Preventative Measures Beyond the Wipe
A weekly cleaning routine is fantastic, but it's just one piece of the puzzle for total ear health.
- Professional Grooming: Regular trips to a professional groomer who understands Goldendoodle coats are invaluable. They can trim or pluck ear canal hair safely and effectively. Discuss this with your groomer.
- Drying After Water Exposure: If your Goldendoodle swims or gets a bath, thoroughly dry their ears afterward. Use a soft towel to absorb as much moisture as possible, and you can even gently use a low-setting, cool-air hairdryer (held far away) to ensure the inside of the ear flap is dry. Why a Wet Goldendoodle Ear Has to Be Dried Fast is crucial knowledge.
- Allergy Management: Many chronic ear infections are linked to underlying allergies, either food or environmental. If your Goldendoodle frequently gets ear infections, discuss allergy testing and management with your vet. This might involve special diets or allergy medications.
- Diet and Supplements: A balanced diet supports overall immune health. Some owners also find certain supplements like omega-3 fatty acids helpful for skin and coat health, which can indirectly benefit ear health. Always discuss supplements with your vet first.
By staying proactive and attentive to your Goldendoodle's ears, you can significantly reduce the risk of painful and costly infections, ensuring those wonderful floppy ears stay healthy and happy for years to come.
Goldendoodle Weekly Ear Care Checklist
Here’s a quick checklist to make sure you’ve got all your bases covered for your Goldendoodle’s weekly ear routine.
| Task | Status | Notes |
|---|---|---|
| Gather Supplies | ✅ / ❌ | Ear cleaner, cotton balls, towel, treats. |
| Choose a Calm Location | ✅ / ❌ | Quiet, distraction-free space. |
| Lift Ear Flap & Inspect | ✅ / ❌ | Check for redness, swelling, odor, discharge. Call vet if severe. |
| Apply Ear Cleaning Solution | ✅ / ❌ | Insert tip gently, squeeze liberally, but don't overflow. |
| Massage Base of Ear | ✅ / ❌ | Gently massage for 30 seconds; listen for squishing sound. |
| Allow Head Shake | ✅ / ❌ | Stand back or use towel to catch spray. |
| Wipe Outer Ear with Cotton Balls | ✅ / ❌ | Use fresh cotton until no visible debris. Avoid deep probing. |
| Repeat for Second Ear | ✅ / ❌ | Ensure both ears receive equal attention. |
| Reward and Praise | ✅ / ❌ | Offer high-value treats and positive reinforcement throughout and after. |
| Dry Ears After Water Exposure (As Needed) | ✅ / ❌ | Towel or cool-air dryer after baths/swimming. |
| Schedule Professional Grooming | ✅ / ❌ | Discuss ear hair trimming/plucking with groomer regularly. |
Disclaimer
This article is for general informational purposes only and does not constitute professional advice. Laws, prices and regulations vary by location and change over time. Consult a qualified professional for guidance on your specific situation.